
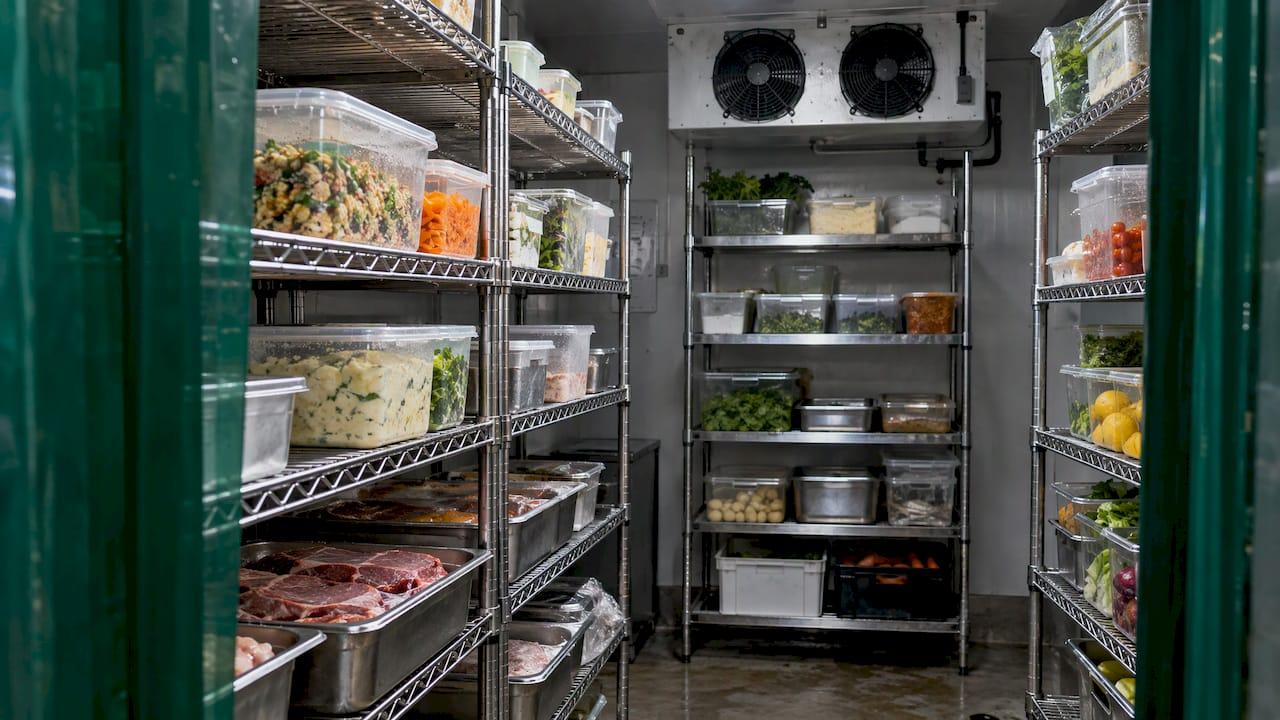
A well-organized walk-in cooler comes down to four habits. Store ready-to-eat food on top and raw poultry at the bottom. Leave air gaps so cold air can move. Label and date everything, with older stock at the front. Check that the room holds 5°C or below. Get those right and you cut cross-contamination risk, waste and the daily hunt for the one tub you need mid-service.
This guide walks through each step the way a head chef would set up a coolroom, with the Australian rules behind it. It suits cafés, pubs, clubs, fish and chip shops and restaurant groups.
TL;DR
- Shelve top to bottom: ready-to-eat and cooked food, then seafood and whole raw cuts, then mince, then raw poultry on the lowest shelf.
- Keep food covered, in sealed containers, off the floor, and clear of the evaporator fan and walls so air can circulate.
- Label every decanted, opened or prepared item with contents and a date, and rotate first in, first out (FIFO) after each delivery.
- Hold food at 5°C or below, measure with a probe rather than trusting the door gauge, and never cool hot food in bulk inside the cooler.
- Give the coolroom a named owner every shift and a fixed weekly and monthly clean.
Table of Contents
- Why a walk-in cooler needs a layout, not just shelves
- The Australian rules behind the layout
- Shelf order: what goes where
- Spacing and airflow: leave the room room to breathe
- Labelling and FIFO: the system that stops waste
- Temperature: 5°C or below, measured properly
- Cleaning and checking rhythm
- Our perspective
- Put your coolroom on autopilot
- FAQ
- Sources
Why a walk-in cooler needs a layout, not just shelves
A walk-in is not evenly cold. Food Safety HQ explains that the zone near the door warms every time it opens, while the floor and bottom corners run coolest. Stock packed against the evaporator or piled to the ceiling blocks the airflow the room relies on.
So the layout does two jobs at once:
- Safety: raw food can never drip onto food that is eaten without further cooking.
- Temperature: every container sits in air that is actually cold, not just in a room with a cold number on the display.
It also does a third, less obvious job. A coolroom with a logical map saves labour. New staff find things fast, orders get counted faster, and you stop buying a second case of something that is hiding behind the first.
The Australian rules behind the layout
The baseline is Standard 3.2.2 of the Food Standards Code. Clause 6(1) requires a food business to store food so it is protected from the likelihood of contamination, and so the storage conditions do not harm its safety or suitability. The same standard requires potentially hazardous food to be kept under temperature control, which means 5°C or below where needed to minimise microorganism growth, or 60°C or above.
The standard does not hand you a shelf diagram. Your local council's environmental health officer reads it against what they see in your coolroom. Practical guidance from councils gives you the picture:
- The Eastern Health Authority in South Australia says food must be covered and stored off the floor in fridges and cool rooms. Raw meats and eggs go separate from, and below, ready-to-eat foods.
- The ACT Government's inspection manual notes that shelves and food-grade containers help keep premises clean, discourage pests and stop raw food contaminating ready-to-eat food.
Rules differ slightly between states and councils, so check your own council's food business guidance for anything specific to your venue.
Shelf order: what goes where
The principle is simple: the less cooking a food will get before it is eaten, the higher it goes. Raw juices only drip down.
| Shelf position | What goes there | Why |
|---|---|---|
| Top | Prepared, cooked and ready-to-eat food (salads, sauces, cooked proteins, dairy desserts) | Nothing above it can drip onto it |
| Upper-middle | Fish and seafood, dairy, produce in covered containers | Handled further before serving, but still kept above red meat |
| Middle | Whole raw cuts of beef, pork and lamb | Surface contamination is reduced by cooking |
| Lower-middle | Raw mince, sausages and other ground products | Higher contamination risk than whole cuts |
| Bottom | Raw poultry | Highest risk, so it sits where a leak cannot reach anything else |
This follows the order in Food Safety HQ's coolroom guide, which puts ready-to-eat and cooked foods on upper shelves and raw poultry, mince, sausages and raw seafood lowest. A U.S. National Restaurant Association guide gives a similar top-to-bottom order, with seafood above whole raw beef and pork, ground meats below that, and raw poultry last. Some Australian venues place seafood lowest alongside poultry, so follow whichever order your council officer has signed off and keep it consistent.
Containers do half the work
Shelf order only protects you if the food is contained. Use sealed, leak-proof, covered containers or food-grade wrap, and keep raw items in trays with a lip. Decant out of cardboard where you can, as cartons shed fibre and soak up moisture. A cracked tub on the bottom shelf is a small problem. The same tub on a top shelf is a recall-sized one.

Zone the room, not just the shelves
Beyond shelf height, give each product family a home:
- Near the door: items you grab fast and that tolerate a little warmth, such as sealed drinks, unopened condiments and hardy produce.
- Deeper in the room: the most temperature-sensitive food, such as dairy, fresh seafood and prepared items, away from the door swing.
- A marked receiving spot: one shelf or trolley for new deliveries until they are checked and put away.
Food Safety HQ makes the same point about keeping the most sensitive stock deeper in the room, away from the door.
Spacing and airflow: leave the room room to breathe
A cooler that is packed to the brim looks efficient and runs badly. Food Safety HQ warns that overloading can stop cold air circulating and let the room drift above 5°C.
Set these rules for your team:
- Keep stock off the floor. This lets air move underneath and keeps the floor cleanable. U.S. guidance suggests at least 15 cm off the floor with 30 cm of ceiling clearance. Use proper dunnage, racks or crates, not timber pallets.
- Never block the evaporator fan. Keep stock clear of it and leave an air zone near the ceiling. Caterware also advises keeping stock clear of walls.
- Do not block floor-level vents or returns. Cold air needs clear pathways to reach all stored products, according to Harbourside Refrigeration.
- Choose open wire shelving where you can. The same refrigeration source recommends it over solid panels to prevent warm pockets, and Caterware says the same.
- Leave gaps between containers. A U.S. rule of thumb is 3 to 6 inches (roughly 8 to 15 cm) between items. You do not need a ruler, but you should be able to slide a hand between tubs.
If you cannot fit your stock without crowding, that is a signal about ordering, not a shelving problem. Par levels set against your real usage, and delivery days that match them, keep volume sensible. Our guide to restaurant delivery schedules covers the four checks to run before stock is stored.
Labelling and FIFO: the system that stops waste
A tidy coolroom that nobody can read is still a gamble. Labels turn the shelf into a system.
What every label should say
Label anything decanted, opened or prepared with its contents and a date. The National Restaurant Association recommends the food type, the date it went into storage and the date it must be used by. Adding the use-by date means a stranger can make a discard decision without asking anyone.
For a deeper look at colour codes, day dots and label formats, see our kitchen labeling system guide. For how long different items really keep, see shelf life management for restaurants and cafés.
FIFO in practice
Safe Food Australia's storage guide advises moving older stock to the front of the shelf after each delivery, checking dates every day during opening procedures, and discarding anything past its use-by date.
So the routine looks like this:
- Unpack the delivery at the receiving spot and check temperature and condition.
- Pull the existing stock forward.
- Place the new stock behind it.
- Label anything you decant.
- Check dates at open and bin what has expired.
One more benchmark worth knowing: Safe Food Australia notes, in material published by City of Wellington (VIC), that unpackaged potentially hazardous ready-to-eat food should generally not be stored for more than 5 days. Build that into your prep labels. For the full rotation method, our stock rotation guide for managers goes step by step.
Temperature: 5°C or below, measured properly
The Standard sets 5°C as the cold limit for potentially hazardous food. Food Safety HQ recommends checking and recording the temperature at least at the start and through each service, using a probe or calibrated display rather than only the door gauge.
Two practical points:
- Probe the food, not just the air. The City of Kwinana (WA) says to use a probe thermometer accurate to ±1°C and to check the centre of the food, not the surface.
- Know your response plan. If the room rises above 5°C, reduce door openings, stop overloading and move sensitive food. If it does not recover, apply the 2-hour/4-hour rule and call for service, as Food Safety HQ outlines.
Write the response plan on the wall beside the log. At 6pm on a Saturday nobody wants to search for it.
Do not cool hot food in the walk-in
A walk-in is built to hold cold food, not to chill a hot stockpot. Food Safety HQ states that bulk hot food should not be cooled in the room. The two-stage rule is 60°C to 21°C within two hours, then 21°C to 5°C within a further four hours. Use shallow trays, an ice bath or a blast chiller, and move food in only once it is around 21°C or below. A large hot pot inside the room warms everything near it and undoes the work you did on layout.

Cleaning and checking rhythm
Organization decays without a schedule. The City of Brisbane's Eat Safe guide says food preparation areas and appliances should be cleaned and sanitised at least every four hours, and that shelving should be scheduled for cleaning weekly.
A workable pattern for most venues:
- Daily: wipe spills, wipe door handles and gaskets, check temperature and dates.
- Weekly: clean shelves, bins and vents, and reset the layout.
- Monthly: pull stock forward and clean behind shelving, mop, and do a full audit of what is in the room against what the system says.
- Quarterly: have a refrigeration technician inspect the unit and coils.
The monthly audit doubles as a stocktake. Our kitchen stocktake process and kitchen inventory checklist show how to count without wasting a morning.
Give the room an owner
Food Safety HQ recommends naming one person each shift to check temperatures, confirm labelling and dating, run the rotation and flag problems. It also suggests marking the shelves themselves with a simple diagram or shelf tags (ready-to-eat up top, raw poultry at the bottom) so new staff store things correctly without asking. In a busy pub or club with casual staff, that one tag saves an argument and a bin full of food.
Our perspective
We built PantryHub by the chef for the chef, and the walk-in is where we see the same problem again and again. The layout is fine on Monday. By Friday it has drifted, because deliveries arrive, counts are done on paper, and nobody can see what is actually on the shelf.
Good organization is a habit, and habits need a system behind them. When your par levels, low-stock alerts and supplier ordering live in one place, you stop over-ordering into a crowded room. You also stop running short because a case was hidden behind another.
That is why we designed PantryHub for Australian venues: AUD pricing, GST-ready reporting, local support and a mobile-first design, so the person standing in the coolroom with a tablet can count, check and reorder on the spot. Our approach is to make the shelf plan and the stock numbers tell the same story.
the author
Put your coolroom on autopilot
A clean layout is the start. Keeping it takes counts, alerts and orders that match what is physically on the shelf. PantryHub is a hospitality inventory and ordering platform for restaurants, cafés, bars and commercial kitchens, with real-time stock tracking, AI-powered low-stock alerts, supplier ordering and multi-location visibility.
Plans are Starter at $39 a month, Regular at $69 a month and Pro at $99 a month, all in AUD, with a free trial to start. See the pricing page to compare them, read more about our hospitality inventory software, or start your free trial and bin the spreadsheets.
FAQ
What is the best way to organize a walk-in cooler?
Store ready-to-eat and cooked food on the top shelves, whole raw cuts in the middle, and raw poultry, mince and sausages on the lowest shelves. Keep everything covered, labelled and off the floor, with gaps between containers. Rotate older stock to the front after every delivery.
What temperature should a walk-in cooler be in Australia?
Potentially hazardous food must be held at 5°C or below under Standard 3.2.2. Check and record the temperature at the start of the day and through each service with a probe or calibrated display. Probe the centre of the food as well as the air.
How far should food be from the floor and ceiling?
Australian council guidance requires food to be stored off the floor, and keeping stock clear of the evaporator fan and ceiling is standard advice. U.S. guidance gives figures of 15 cm off the floor and 30 cm of ceiling clearance. Check with your local council for any specific measurement it expects.
How often should I clean and reorganize the cooler?
Wipe spills and handles daily, clean shelves and vents weekly, and do a deeper clean behind shelving monthly. Schedule a refrigeration technician check quarterly. Check dates every morning so expired stock never builds up.
Can I cool hot food in the walk-in?
Not in bulk. Cool it from 60°C to 21°C within two hours, then to 5°C within a further four, using shallow trays, an ice bath or a blast chiller. Move it into the walk-in once it has reached about 21°C or below.
Sources
- Walk-In Coolroom Organisation for Restaurants (Food Safety HQ)
- Food Safety Practices and General Requirements, Standard 3.2.2 (legislation.gov.au)
- Eastern Health Authority Food Business Welcome Pack
- ACT Government Food Business Inspection Manual
- National Restaurant Association: reorganize your walk-ins
- How to Maximise Efficiency in Your Walk-In Cooler (Caterware)
- Organising Your Cool Room Shelving (Harbourside Refrigeration)
- Safe Food Storage (Safe Food Australia)
- Food Safety Process record book (City of Wellington)
- Guide to the Operation of a Food Business (City of Kwinana)
- Eat Safe Brisbane food safety guide (City of Brisbane)